Thursday, December 18, 2008

Setup Windows XP Automatic Update


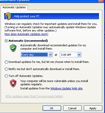
Setting up an automatic windows update will detect and download updates for your system. You can schedule day and time to do the update and or let the windows run the update daily. To set the windows xp automatic update:1. Click Start and Control Panel2. Click on the Security Center icon in the Control Panel3. Click the Automatic Update at the bottom of the Security Center4. Choose Automatic update option and click ok

Update Windows XP


To update Windows XP over the Internet through the Internet Explore;1. Connect to the Internet. 2. Open your browser.3. Select Tools, and click on Update Windows.4. Wait while the Microsoft determines your update requirement.5. You will get the options "Custom Install" and "Express Install".6. We recommend that you choose "Express Install". Express install will select all the updates you need. Custom install is for to select which updates to install and which update not to install.7. Restart your computer once the updating finishes

Upgrading your operating system to Windows XP

Check if your computer has sufficient resources to run Windows XP before you attempt to upgrade. You can do this by using MS Windows XP Upgrade Advisor or running click "Check System Compatibility" once the CD-Starts up.
Start up your computer and run the currently installed Windows.
Insert the Windows XP CD into your CD drive or DVD drive.
CD should automatically run and launch Windows XP start up menu..
Click the "Install Windows XP" once the setup menu pops up.
Welcome to Windows XP Setup popup window will appear. Make sure you select Upgrade from the list. If you select New Installation, that will install fresh copy of Windows XP on your hard drive. Click Next.
Read the End-User License Agreement, and click the "I accept this agreement" button.
Enter the registration code that come with Windows XP package and click next.
Keep clicking next. Enter if widows ask your area cod for the modem setting. Choose your Time Zone "Eg: Eastern Time". If you do not select correct Time Zone, your computer time might be wrong.
Enter the registration code that come with Windows XP package and click next.
Enter your name once asked by the windows setup.
Your computer should restart when the setup completes the installation.
If your version of Windows XP is Pro Edition with Server Pack 2. Firewall option will pop up. Select the option that says "Help Me Protect My Computer" to activate windows firewall. Note: If you notice improper graphic display or hardware device such as network card, sound card, modem, etc malfunctioning. The driver of that component is not installed. Find your mother board CD or expansion card CDs and install them.

Formating HD and Installing Fresh Windows XP

To format your hard drive complete and install fresh copy of windows xp on your computer or install Windows XP to a new hard disk, you have to run Windows XP from bootable CD. To do this:
Turn off your computer.
Insert the Windows XP bootable CD. If you do not have a bootable CD, download the WinXP 6-floppy disk from BootDisk.com to startup the installation process.
Turn on your computer and press any key when it asks "Press any key to boot from CD". Your computer should run from the CD inserted and start Windows XP installation wizard. If your computer jumps to the installed operating system or does not read from the CD. In that case, set up the boot sequence in the BIOS. Your computer will tell you how to access to the BIOS when you turn on. Some computers use DELL key or F2 key to access the BIOS. Your boot sequency should be: A drive first, CD second, hard drive third.
Read the End-User License Agreement, and then press F8.
At the Welcome to Setup screen, press ENTER to start Windows XP Setup.
Follow the instructions on the screen to select and format a partition where you want to install Windows XP.
Follow the instructions on the screen to complete Windows XP Setup.
Once the installation is finished, your computer will automatically restart. Note: If you notice improper graphic display or hardware device such as network card, sound card, modem, etc malfunctioning. The driver of that component is not installed. Find your mother board CD or expansion card CDs and install them

What is operating system (OS)?

Operating system is a computer program that controls the components of a computer system and facilitates applications and data. Some of the operating systems available in the market today are: Window 98, Windows Me, Windows 2000, Windows XP, Linux, UNIX, and MacOS. We are only going to discuss installing Windows XP for this tutorial since we are only focusing Personal Computer. Windows XP is the latest Microsoft Operating system widely available

Setting up and connecting the input output devices


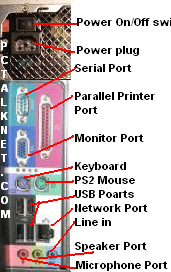
Setting up and connecting your computer system input and output devices is very easy. All recently manufactured computers use color code which makes even easier to setup. The color of the port matches with the color of the device connector. Also, usually there is an icon of the device beside the device port. Refer to the picture on the left to see how the color coding work and how to connect all the computer devices. Steps to connect your computer;1. Connect your power cord to the wall jack and to your computer2. Connect the monitor to the monitor serial port as the picture shows3. Connect your mouse and keyboard to the ports as the picture shows4. Connect your speakers jack to middle line (normally green color). Connect your speaker power code5. Connect all your USP devices. There are list of devices come with USB connection including I/O devices, Digital Imaging devices, printers, mobile phones, USB-to-Serial & vice versa, etc.6. Connect your network card to the PC and to the router

What are Input devices?

Input devices are components that you use to feed information to the computer system. Input devices are hardware items such as; Keyboard, Mouse, Scanner, Microphone, Trackballs, Joysticks, Digitizer, etc. Output devices are components that retrieve information from the computer. Output devices are hardware items such as; Monitors Printers, Speakers, Terminals, Facsimile, etc.

Setting up your basic computer input/out devices

This tutorial will show you how setup or connect your basic computer components such as monitor, keyboard, mouse, speakers, headphone, scanner, printer, camera, joystick, etc. It assumes that you have running system

Installing Compact Disk (CD-ROM/CD-RW, DVD/DVD+/-RW


Installing CD and DVD are same. They both have same connection pins and use the same method to connect.1. Set the jumpers to master or select if unshared data cable is used.2. Connect the IDE data cable to the mother board drive controller.3. Connect the other end of the data cable to the compact disk drive 4. Connect the 4-pin connector from the power supply to the hard drive.5. Connect your audio cable to the compact drive.6. Turn on the computer and test if the compact disk drive works. Your compact disk drive does not need any software or bios settings to work. It should automatically work once you install it properly. You can set the boot sequence in bios only if you need to.

What you should know

CD-RW is identify by front numbers like 52x32x52 which refers to its reading and writing speed. Higher numbers are better to read and write faster. CD-ROM will only have one number at the front, for example 52x. Similar to installing hard drive, the trickiest part of installing your compact disk is setting up the jumpers. Most PC's use IDE connection and accommodate two drives per cable. Connecting two drives (Hard Drive/CD-WR) to single IDE cable requires you to set jumpers; set first drive (hard drive) master and second drive (CD-RW/DVD+/-RW) as slave. If you connecting the IDE data cable to single drive, set the drive jumper to master or select. You may have 2 IDE data cables connecting to the motherboard and each cable could connect to one or two drives. Compact disks have audio cable that connects to the soundboard or motherboard.

What are CD-ROM/WR and DVD-ROM+/-WR?

CD-ROM (compact disk read only memory) is removable media drive that hold 750+ megabyte of data.CD-RW (compact disk re-readable re-writable) is extension of CD-ROM that allows data to be erased and write again.DVD (digital versatile disk) store close to 10GB for single layer and 17GB for dual-layer disk. DVD can store movies with high graphic and sound quality and data.DVD+/-RW (DVD re-readable re-writable) is extension of DVD-ROM that allows data to be erased and write again.

Installing the Hard Drive


1. Set the jumpers to master or select for your primary hard drive with shared data cable.2. Connect the IDE data cable to the mother board drive controller.3. Connect the other end of the data cable to the hard drive 4. Connect the other end of the IDE data cable to the had drive.5. Connect the 4-pin connector from the power supply to the hard drive.6. Turn on the computer and test if the drive works. The computer will only power up and detect the hard drive. At this point, you are ready to install a CD-RW/DVD-+ and operating system.

What you should know


Hard drive size is measured by Gigabyte. They come in the storage sizes of 8GB to over 320GB. A decent computer should have 20GB or over. Hard drive use 40-pin connection data cables. The hard drive stores all your programs, data, operating system, and hard ware drivers. The trickiest part of installing your hard drive is setting up the jumpers. Most PC's use IDE connection and accommodate two drives per cable. Connecting two drives (Hard Drive/CD-RW) to single IDE cable requires you to set jumpers; set first drive (hard drive) master and second drive (CD-RW) as slave. If you connecting the IDE data cable to single drive, set the drive jumper to master or select.

What is hard drive?


Hard drive is the primary storage device on your computer. It stores all the computer's systems and data for the CPU to process. Hard drive size is measured by Gigabyte (GB). The most common interface standard for passing data between a hard disk and a computer are IDE and SCSI

Wednesday, December 17, 2008

Installing PCI Network card, Sound card, Modem or Other PCI Cards

Various expansion boards use PCI slot connection including Network card, Modem, Video Card, Sound Card, etc.Connecting a PCI card is similar to connection a AGP card. The difference is, you insert the PCI card to the PCI slot on the motherboard. 1. Unplug the computer electric and put on an anti static wrist strap to prevent electrostatic discharges damages to the circuit.2. Insert the PCI card into the slot holding both end of the board. 3. Make sure the PCI expansion card is inserted in to the slot evenly and completely. 4. Once you insert the card to the slot, fasten down the card to the case with screw.5. Turn on the computer and install the drivers. Windows XP provide generic drivers for most of well known manufacturers but in case card driver was not automatically found, you should have a driver CD.5. Connect the external device such as Network cable, modem cable, speaker jack, etc to card and test run.

What is Expansion Slot?

Expansion slots (bus slots)) connect expansion cards to the motherboard. Expansion Cards are the devices such as a video card, network card, sound card, modem, and etc. There are five types of expansion slots; PCI, AGP, USB, ISA, and AMR. Your motherboard should have at least AGP, and PCI slots. AGP (Accelerated Graphics Port) is designed to connect your AGP video card to the mother board and uses a superset of PCI specification to handle huge volume of video data. The key feature of AGP is its high speed interface to the main memory. PCI (Peripheral Component Interconnect) is designed to connect general purpose devices. You can find PCI video cards, network cards, modems, sound cards, USB ports, etc. USB (Universal Serial Bus) allows to connect multiple external plug-and-play devices. There are huge selection of devices that come with USB connection. ISA (Industry Standard Architecture) offers limited data throughput and resources compared to other expansion slots. Newer computers do not come with ISA slots at all.

Installing the RAM Memory


After you find out what type of memory you have and obtain the memory sticks. 1. Unplug the computer electric and put on an anti static wrist strap to prevent electrostatic discharges damages to the circuit.2. Locate the RAM slot on your motherboard. 3. Open the memory holder clips. 4. Insert the memory into the slot holding both end of the memory stick. Memory modules can only be inserted one way.5. Make sure the memory is inserted in to the slot completely. Memory holder clips will automatically close when you clip in the memory.You can test the computer before closing the case to see if the installation was success

What you should know


When buying RAM memory, you must purchase a memory that is compatible with your computer. Your motherboard could either have DIMMs (dual inline memory modules) or RIMMs (rambus inline memory modules) or SIMMs (single inline memory modules) slots which are different in size. and style. DIMMS are available in both 168-pin and 184-pin connection. RIMMS are available 184-pin connection. There are various types of memory such as SDRAM, DDR SDRAM, and RDRAM.
SDRAM Synchronous DRAM is previous version of DDR SDRAM compatible. It has sub groups of PC66, PC100, PC133, and PC150 SDRAM. SDRAM is available in DIMM form.DDR SDRAM Double data rate SDRAM is enhanced newer version of SDRAM. It's available in PC1600,PC2100, PC2700, & PC3200. DDR SDRAM is available in DIMMs form. RDRAM Rambus DRAM is another popular type of RAM memory which is normally available in RIMMs form.The best advice of all is to read your motherboard documentation and purchased exact ram memory type mentioned. If you are upgrading the memory, take out the pre-installed ram and buy exact type.

What is RAM Memory?

Random Access Memory is the function that process active programs and data. It allows the computer to store data and programs temporarily. The more memory you have, the more programs you can run simultaneously and the more data can be held for faster access by your machine. RAM memory does not retain your data after shutdown

Installing the processor


It's easier to install the CPU before inserting the motherboard to the case. 1. Locate the CPU socket on the motherboard and open it by lifting the lever on the side. 2. Insert the processor evenly into the socket.3. Close the lever without forcing it. If the CPU is aligned to the socket well, it should easily clip in. Once it clips in, close the lever back.4. Align and Mount the CPU fan or heat sink to the top of the processor

CPU (Central Processor Unit) Types

The CPU or the Central Processing Unit is the brain of your computer. It processes all the programs, instructions, logics, calculations and hardware coordination. The performance of your computer depends its CPU power measured by MHz
Your motherboard documentation or manufacturer web site will indicate the processor that your motherboard will support. For example; Intel® Socket 478 motherboard might only support Intel Pentium 4 processors. If you are not sure, buy motherboard with pre-installed processor. The major groups of Processors are; Intel Pentium, Intel Celeron, AMD, and Cyrix. Each group has sub groups

Installing Motherboard


After you prepare your case with power supply installed, then the next thing is to install your mother board. 1. First, put on an anti static wrist strap to prevent electrostatic discharge damages to the circuit.2. Open the case and locate the motherboard mounting riser pins or mounting holes.3. Insert the motherboard and make sure back panel connector is facing the power supply side with screws holes matching the mounting holes. Secure the motherboard to the case with screws.4. Once you secure the motherboard to the case, connect all the components that need to be connected to the motherboard including CPU, memory modules, PCI, AGP cards, UBS ports, etc.

Preloaded Mother board

Today you can buy a motherboard with all ports to run a complete system pre-installed. If not, your motherboard should atleast have 2 Serial Ports for serial mouse and serial modem, parallel ports for parallel port printer, keyboard port for for keyboard connection, mouse port for mouse connection, and usb ports.

Motherboard Types/Classifications

There are a number of motherboard classifications or form factors. Four classifications that you would find in market today are; Baby AT, ATX, LXP, and NLX . NLX is just upgrade of LXP. The other thing to consider when buying motherboard is the socket type it has and maybe the manufacturer if you trust one manufacturer than another. Read the document of your mother to make sure it supports type of CPU processor you will install. For example; Intel® Socket 478 motherboard might only support Intel Pentium 4 processors. If you are not sure, buy motherboard with pre-installed processor

What is Motherboard


The motherboard is the heart of your computer and consists the CPU, BIOS, memory, mass storage interfaces, serial and parallel ports, usb ports, expansion slots, and all the controllers required to control standard peripheral devices, such as the display screen, keyboard, and disk drive. All these components are the organs of your computer and together on a circuit are called motherboard. A motherboard may have on board component. On board components are modules already integrated to the main circuitry on the motherboard. Your motherboard might have on board AGP card, Network card, Modem, & Sound Card

Installing the power supply


Before openning your case, we recommend that you put on an antistatic wrist strap to prevent electronstatic discharge dammages to the circuite.1. Open your case by removing the screws or mounts.2. Remove if there is pre-installed power supply.3. Insert and mount your new power supply in the power supply bay. Make sure your power supply is properly mounted.4. Connect the power supply to the motherboard. (Your power supply should have 6-pin for Baby AT-Style or 20-pin ATX-Style connection).5. Connect the power supply to the drives. 6. Make sure all the connectors and mounts are installed firm.

Choose a Power Supply

Power supply is the sub component that supplies electric power to your system. It's the power engine of your computer. Your PC Chassis may come with pre-installed power supply but it's best to get power supply that is capable of providing enough power to the system. When selecting your power supply, do a research and buy power supply that provides efficient and stable power with genuine manufacturer label.

CHOOSE A COMPUTER CASE

The style and size of the computer Case various. The three main classifications are tower, desktop, and baby tower. Baby tower/Desktop is small case and fits only few optional components. It fits small motherboard, few pci slots or ports, and one external drive. Tower is tall and large enough to hold the maximum number of hardware components with better airflow than desktop case. If you need to install 2 or more external drives and large motherboard that supports extra ports for upgrade, this might be your choice. Towers vary in size, there are mini-tower, mid-tower, and full-tower. Desktop vary in size and style but are flat and wide and normally support 1 or 2 external drives. Some desktop cases are large to support large motherboard with extra expansion cards when others might support few expansion cards.

Sunday, December 14, 2008

CHOOSE A COMPUTER CASE

The style and size of the computer Case various. The three main classifications are tower, desktop, and baby tower. Baby tower/Desktop is small case and fits only few optional components. It fits small motherboard, few pci slots or ports, and one external drive. Tower is tall and large enough to hold the maximum number of hardware components with better airflow than desktop case. If you need to install 2 or more external drives and large motherboard that supports extra ports for upgrade, this might be your choice. Towers vary in size, there are mini-tower, mid-tower, and full-tower. Desktop vary in size and style but are flat and wide and normally support 1 or 2 external drives. Some desktop cases are large to support large motherboard with extra expansion cards when others might support few expansion cards.

Build Your Own PC

This tutorial will teach you basic information about building your own personal computer but will not provide all possibilities of building your super computer. This information may not be complete instructions and recommends new parts with drivers. We will show the components that you need to build a decent computer. The tutorial is intended for any one interested learn what is involved putting together the box.
List of hardware components you might install
PC Case
Power Supply
Motherboard
CPU Processor with Cooling Fan
RAM Memory
Hard Drive
Floppy Drive
CD-ROM, CD-RW, DVD, DVD/CD-RW Combo
Video Card
Sound Card
Ethernet/Network Card, Modem
USB Ports
Keyboard, Mouse, Monitor, Speakers
You might not need all the components listed above but the minimum components required for your computer to run are; Power Supply, Integrated Motherboard with chases/cables, CPU processor/fan, Memory modules, Hard Drive, Video Card, Keyboard, Monitor.
Optional components required for your computer to function as a modern computer are; Mouse, Floppy Drive, CD-ROM, Sound Card, Network Card, USB Ports, and Speakers. Install rest of the components above only if you need them.
For the next page and on, we will explain each component in details and provide instruction of attaching to your computer.